
1. What you need
Leave yourself free system RAM at least as large as the model file, plus a couple of gigabytes for the first reply. Leave about 5 GB of disk for the package, plus the model (often 10–20 GB). Launch shows you whether that model fits on the cards you picked before it starts.
nvidia-smi -L
nvidia-smi | head -3
ldd --version | head -1
df -h .
You should see the card names, a driver version in the nvidia-smi banner, and a glibc version.
- Linux, 64-bit Intel or AMD.
- NVIDIA driver 570 or newer. Upgrade the driver, not a CUDA toolkit. The package carries its own CUDA runtime.
- Cards this build runs: Tesla P100 (16 GB), GTX 1080 Ti and the 10-series, Tesla P40, Tesla V100 (16 GB or 32 GB), Titan Xp, Quadro P-series. RTX 20-series and newer are not in this build.
- glibc 2.38 or newer for the main tarball (Ubuntu 24.04+, Debian 13+, Fedora 39+). 2.35 or newer for the
-ubuntu22.04tarball. Older than that: use the container. python3onPATH. The launcher uses it. You do not need pip, conda, or a compiler.- Disk: about 5 GB for the package, plus the model file (often 10–20 GB).
2. Install from the tarball
The tarball is the whole program. It does not install a driver, and it does not need a CUDA toolkit. You need Linux on 64-bit Intel or AMD, an NVIDIA driver 570 or newer, and glibc 2.38 or newer. On Ubuntu 22.04, use the -ubuntu22.04 tarball (glibc 2.35) or the container.
Cards this build runs: Tesla P100, GTX 1080 Ti and the rest of the 10-series, Tesla P40, Tesla V100. RTX 20-series and newer are not in this build.
Tarball
Get pxa-v3.1-linux-x86_64-cuda12.8-sm60_61_70.tar.gz from the release page, then:
tar xzf pxa-v3.1-linux-x86_64-cuda12.8-sm60_61_70.tar.gz
cd pxa-v3.1-linux-x86_64-cuda12.8-sm60_61_70
./pxa --doctor
./pxa
You should see a driver line and one line per card. Nothing starts. If you did not name a model, it tells you to pass -m FILE when you want that file checked too.
Check the download yourself
Each release file has a .sha256 next to it. Download both, then check. You should see the file name followed by OK.
curl -fL -O https://github.com/poisonxa16/pxa/releases/download/v3.1/pxa-v3.1-linux-x86_64-cuda12.8-sm60_61_70.tar.gz
curl -fL -O https://github.com/poisonxa16/pxa/releases/download/v3.1/pxa-v3.1-linux-x86_64-cuda12.8-sm60_61_70.tar.gz.sha256
sha256sum -c pxa-v3.1-linux-x86_64-cuda12.8-sm60_61_70.tar.gz.sha256
Or let the installer pick the tarball for your glibc, check the checksum, and unpack it:
curl -fsSL https://raw.githubusercontent.com/poisonxa16/pxa/main/install.sh | bash
Add -s -- --docker after bash to pull the container image instead.
Container
Your models are not in the image. Mount a folder of .gguf files at /models. The pxa-cache volume keeps the expert counts a session learns. Without it, they disappear when you remove the container.
docker run -d --name pxa --gpus '"device=0,1"' --shm-size=1g -p 8080:8080 \
    -v /path/to/models:/models:ro \
    -v pxa-cache:/work/.cache/pxa -e PXA_CACHE_DIR=/work/.cache/pxa \
    ghcr.io/poisonxa16/pxa:v3.1
Add -p 7777:7777 and the word gui to open PXA Control instead of only the server. If --gpus fails with an ldcache error, use --runtime=nvidia -e NVIDIA_VISIBLE_DEVICES=0,1.
Use a PXA quant for the speed this build is tuned for. A standard GGUF quant still loads on the same command. Model files: huggingface.co/poisonxa.
Open Control
./pxa opens PXA Control in your browser at http://127.0.0.1:7777. If that port is taken, it uses the next free one. It listens on this machine only.
From the command line, ./pxa --gpus 0 --model your-model.gguf --yes starts a server and opens Control beside it, with a Stop button. The startup line includes PXA Control: http://127.0.0.1:7777. ./pxa --tui asks the same questions in the terminal. ./run-server.sh -m your-model.gguf serves on port 8080 with no page.
Where models go
Your models are not in the tarball. Put .gguf files in a folder and point Launch at it, or pass --models-dir (you can repeat it). You can also drop files in ./models, ~/models, or /models. Use a PXA quant for the speed this build is tuned for. Files: huggingface.co/poisonxa.
Update
pxa-update is in the package bin/. It checks a download against its checksum, stages it, and switches a current link. It refuses to replace an install while a server from that install is running. It does not restart anything, and it does not touch your models or settings. There is no beta channel for the program itself in v3.1 (pxa-update lib is a separate library channel).
pxa-update check
pxa-update apply
pxa-update rollback
You should see current=, latest=, and update=yes or update=no. rollback only moves the link back to the previous folder.
Uninstall
Stop Control with Ctrl-C in the terminal where you started it, and stop any server it started. Then delete the unpacked folder. Your models stay where you put them. The small settings under ~/.config/pxa/ stay too; delete that folder only if you want those gone.
If you used Docker, stop and remove the container, then drop the image if you do not want it:
docker rm -f pxa
docker rmi ghcr.io/poisonxa16/pxa:v3.1
That does not delete the pxa-cache volume. docker volume rm pxa-cache removes the learned expert counts. Leave it if you plan to install again.
3. Docker image
The image is ghcr.io/poisonxa16/pxa:v3.1. It is the same program. Your models are not inside it.
NVIDIA Container Toolkit (Ubuntu and Debian)
If nvidia-smi works on the host and Docker cannot see a card, install the toolkit, tell Docker about it, and restart Docker. These are NVIDIA’s current apt steps. Their guide, including a pinned package version, is Installing the NVIDIA Container Toolkit.
sudo apt-get update && sudo apt-get install -y --no-install-recommends ca-certificates curl gnupg2
curl -fsSL https://nvidia.github.io/libnvidia-container/gpgkey | sudo gpg --dearmor -o /usr/share/keyrings/nvidia-container-toolkit-keyring.gpg
curl -s -L https://nvidia.github.io/libnvidia-container/stable/deb/nvidia-container-toolkit.list | \
  sed 's#deb https://#deb [signed-by=/usr/share/keyrings/nvidia-container-toolkit-keyring.gpg] https://#g' | \
  sudo tee /etc/apt/sources.list.d/nvidia-container-toolkit.list
sudo apt-get update
sudo apt-get install -y nvidia-container-toolkit
sudo nvidia-ctk runtime configure --runtime=docker
sudo systemctl restart docker
Can the container see a card?
You should see the same table nvidia-smi prints on the host.
docker run --rm --gpus all ubuntu:22.04 nvidia-smi
You should see the same table as on the host.
Server only
docker run -d --name pxa --gpus '"device=0,1"' --shm-size=1g -p 8080:8080 \
    -v /path/to/models:/models:ro \
    -v pxa-cache:/work/.cache/pxa -e PXA_CACHE_DIR=/work/.cache/pxa \
    ghcr.io/poisonxa16/pxa:v3.1
Then curl -s http://127.0.0.1:8080/health. A healthy server answers with "status":"ok". More than one card needs --shm-size=1g. The pxa-cache volume keeps learned expert counts. Without it they are deleted when the container is removed.
PXA Control in Docker
Inside a container, 127.0.0.1 is the container, not your browser. Control in the image listens on every interface behind the access token. Publish the port.
docker run -d --name pxa-control --gpus '"device=0"' --shm-size=1g \
    -p 7777:7777 \
    -v /path/to/models:/models:ro \
    -v pxa-cache:/work/.cache/pxa -e PXA_CACHE_DIR=/work/.cache/pxa \
    ghcr.io/poisonxa16/pxa:v3.1 gui
The word gui is the image’s command for Control. The token is printed in the container log once at start. Open the printed address and paste the token when asked. The first visit with ?token= on the URL stores a cookie so you do not paste it every time.
Compose
The release includes docker/docker-compose.yml and docker/.env.example. Copy the example and set three values. MODELS_DIR is the folder on your machine. MODEL_FILE is only the file name. GPUS is a JSON list of the numbers nvidia-smi prints, with quotes: ["0"] or ["0","1"].
cd docker
cp .env.example .env
# edit MODELS_DIR, MODEL_FILE, GPUS
docker compose up -d
docker compose logs -f pxa
curl -s http://127.0.0.1:8080/health
The first start can take minutes. The health check waits five minutes. Do not shorten that wait: Docker treats a slow load as a failure and restarts the container in a loop. To change the port, change PXA_PORT in .env only. To bring a plain docker run back after a reboot, add --restart unless-stopped to that command.
Which cards
--gpus '"device=0,1"' uses the host numbers from nvidia-smi. If that fails with nvidia-container-cli: ldcache error, use --runtime=nvidia -e NVIDIA_VISIBLE_DEVICES=0,1. The number you pass is the host card. Inside the container, nvidia-smi may list that same card as index 0.
4. Unraid
Install the Nvidia Driver plugin so nvidia-smi works on the host. On Unraid, --gpus often fails with an ldcache error. Add the container yourself:
- Repository:
ghcr.io/poisonxa16/pxa:v3.1 - Extra parameters:
--runtime=nvidia --shm-size=1g - Variable
NVIDIA_VISIBLE_DEVICES: the card numbers fromnvidia-smi, such as0or0,1 - Port
8080for the server, or7777if you set the command togui - A host path for your models, mounted at
/models, and a cache path mounted at/work/.cache/pxa
5. PXA Control from another machine
By default Control listens on this machine only (127.0.0.1). --lan listens on every interface and requires an access token.
./pxa --lan
The token is printed at start, next to the addresses to open. It is also kept in ~/.config/pxa/token (mode 0600) so a bookmark still works after a restart. Open http://<the-machine>:7777/?token=<the-token> once. That visit stores a cookie. After that, the bare address is enough on that browser. A phone on the same network uses the same URL.
Do not forward that port to the internet. The token is a password for the page that starts servers on your cards. Reach the machine through a VPN, such as Tailscale, instead of a router port-forward.
If the page does not load from another computer on your network, open the Control port for your LAN only. Replace 192.168.1.0/24 with your own subnet.
sudo ufw allow from 192.168.1.0/24 to any port 7777 proto tcp
sudo firewall-cmd --permanent --add-rich-rule='rule family="ipv4" source address="192.168.1.0/24" port port="7777" protocol="tcp" accept'
sudo firewall-cmd --reload
Use ufw or firewall-cmd, whichever your distro has. Do not run ufw allow 7777 by itself. That opens the port to everyone.
6. First model
Download one .gguf into your models folder. A small file you can start with:
mkdir -p ~/models
cd ~/models
curl -L -O https://huggingface.co/poisonxa/PXA-bench-files-GGUF/resolve/main/fusion2-35b-U16-q8head.gguf
Want the big one? The exact Qwen3.8 Flash-Next file behind our Overdrive numbers is free. It runs on one 16 GB P100 or V100 plus system RAM (it needs about 70 GB of free RAM on one card; 96 GB in the machine is comfortable), or on two cards. Get the .gguf and the .expert-counts.csv next to it into the same folder:
cd ~/models
curl -L -O https://huggingface.co/poisonxa/Swift-1.5-Qwen3.8-Flash-Next-PXQN-32GB/resolve/main/Swift-1.5-Qwen3.8-Flash-Next-PXQN-32GB.gguf
curl -L -O https://huggingface.co/poisonxa/Swift-1.5-Qwen3.8-Flash-Next-PXQN-32GB/resolve/main/Swift-1.5-Qwen3.8-Flash-Next-PXQN-32GB.gguf.expert-counts.csv
It is 83 GB on disk; most of that is a lookup table that stays in RAM, not on the card. Model page: huggingface.co/poisonxa/Swift-1.5-Qwen3.8-Flash-Next-PXQN-32GB.
For the speed this build is tuned for, use a PXA quant from the same page. Then:
./pxa --models-dir ~/models
On Launch, tick the cards, pick the file, read the plan, press Start. When the phase says serving, open Chat and ask something. The line under the reply is the token meter.
7. PXA Control
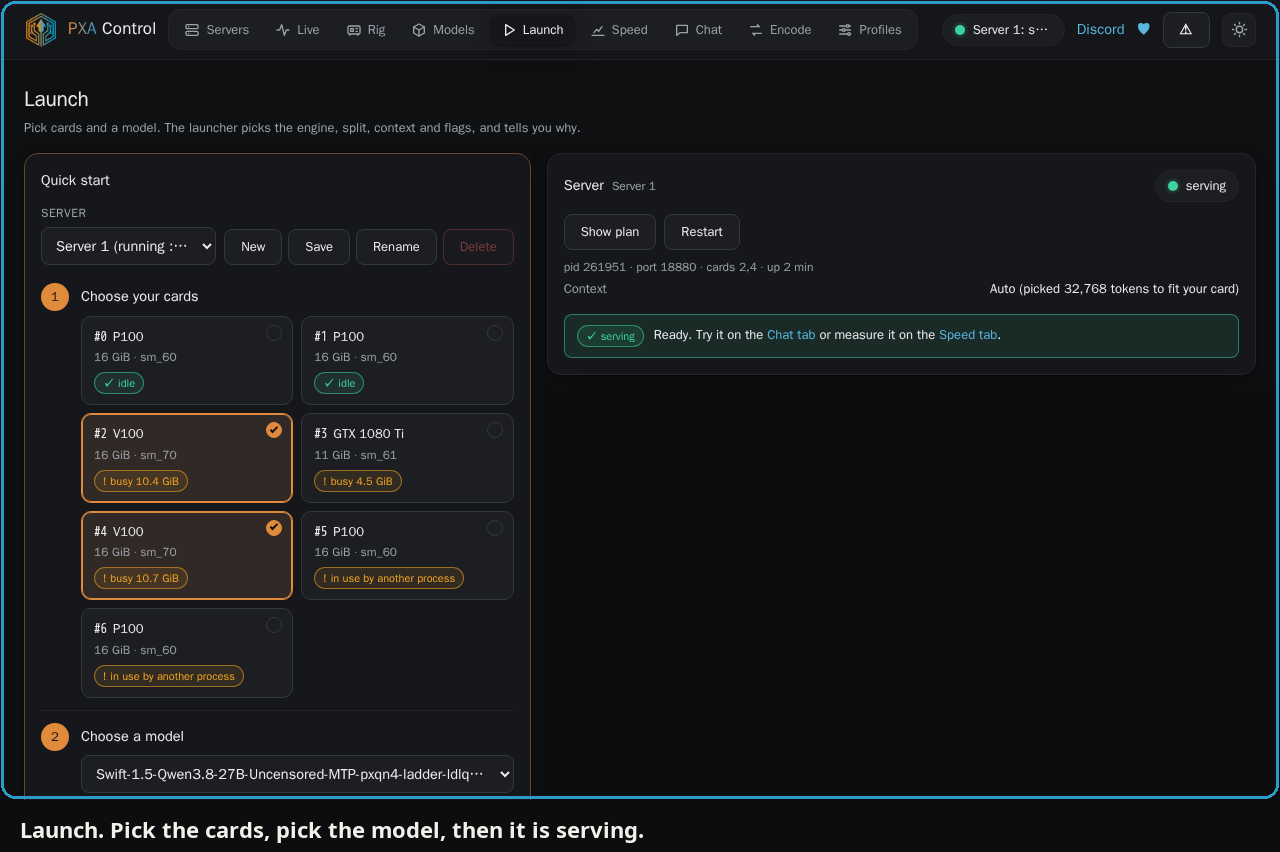
Launch
Pick the cards. Pick a model. Press Start. The plan says whether the model fits before anything loads. When the phase says serving, the model is up.
Servers
Servers is the list of what Control is running. Each row is one server: the model, the port, and whether it is up. Stop is on that row. Starting another model does not require a second install.
Live
Live shows the cards that are serving, the decode speed of the last request, and how full the context cache is. It keeps recording while the page is closed. Use it to see that a request is actually moving, not to publish a benchmark. For a number you can stand behind, use Benchmark my rig.
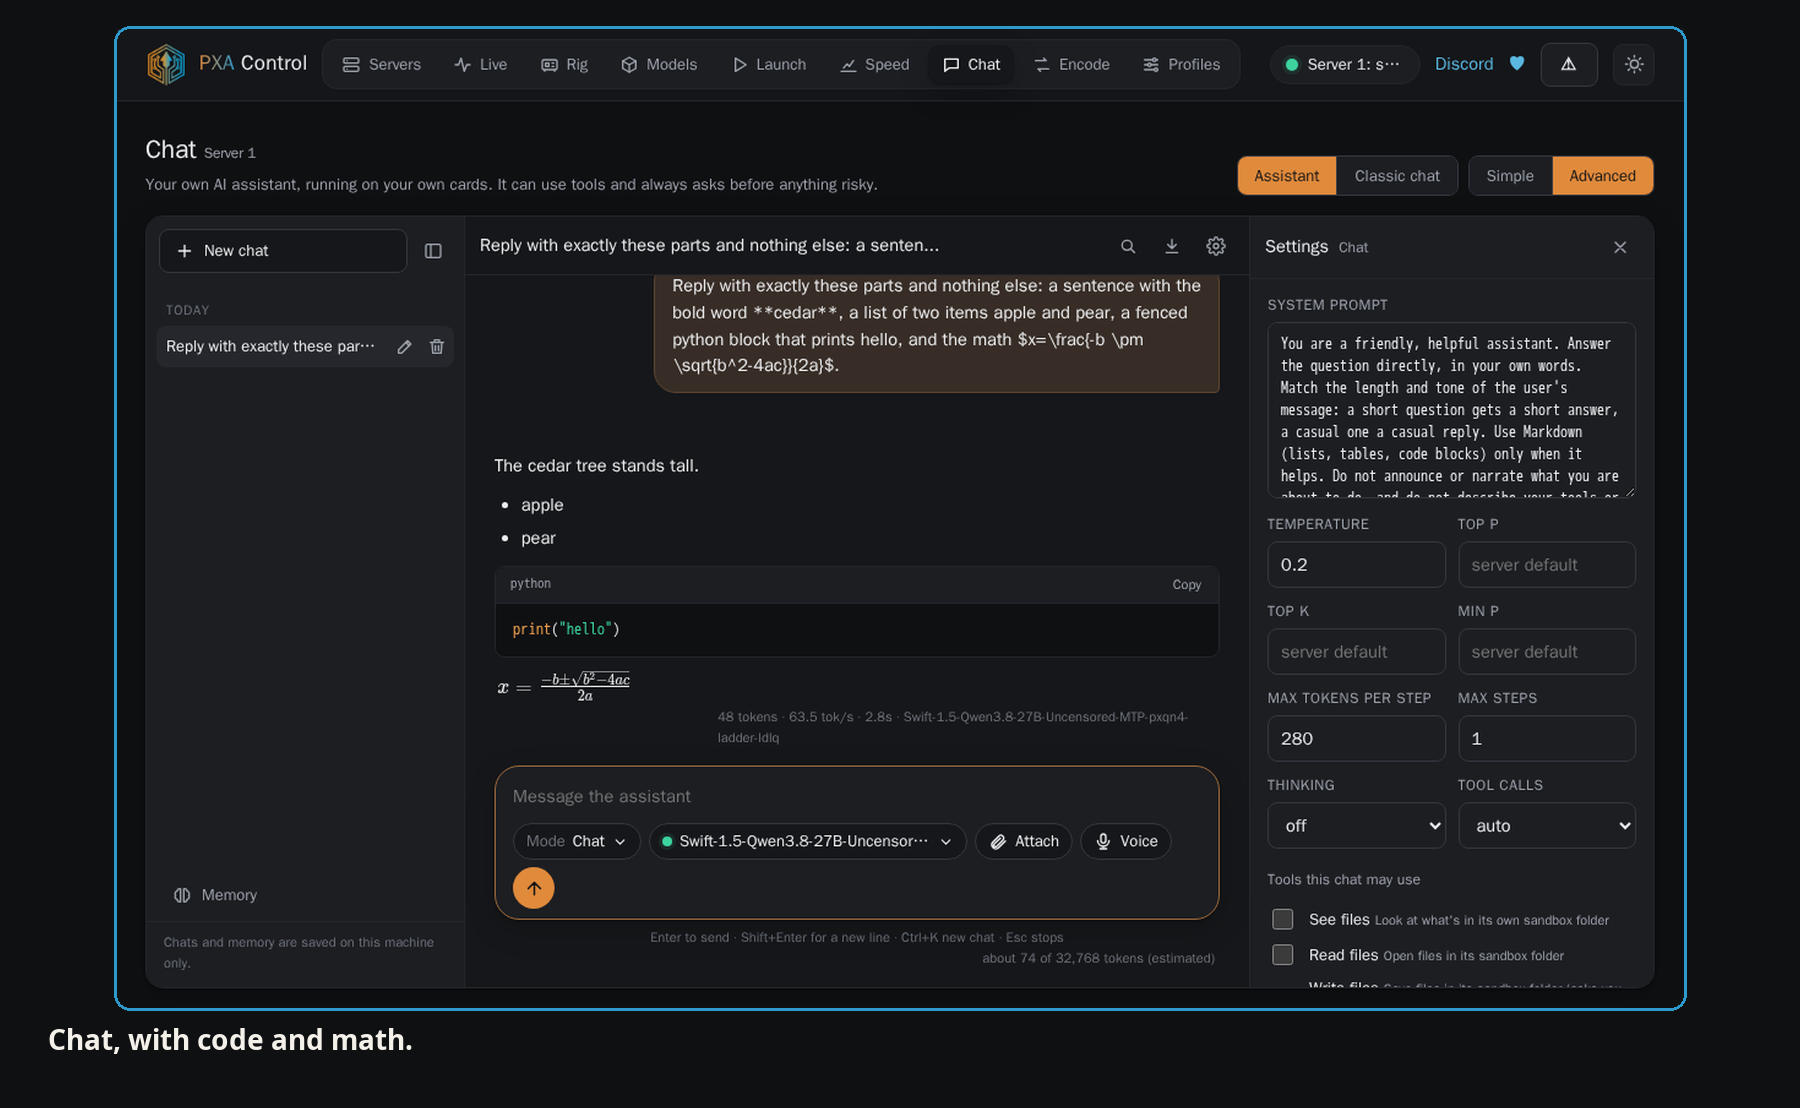
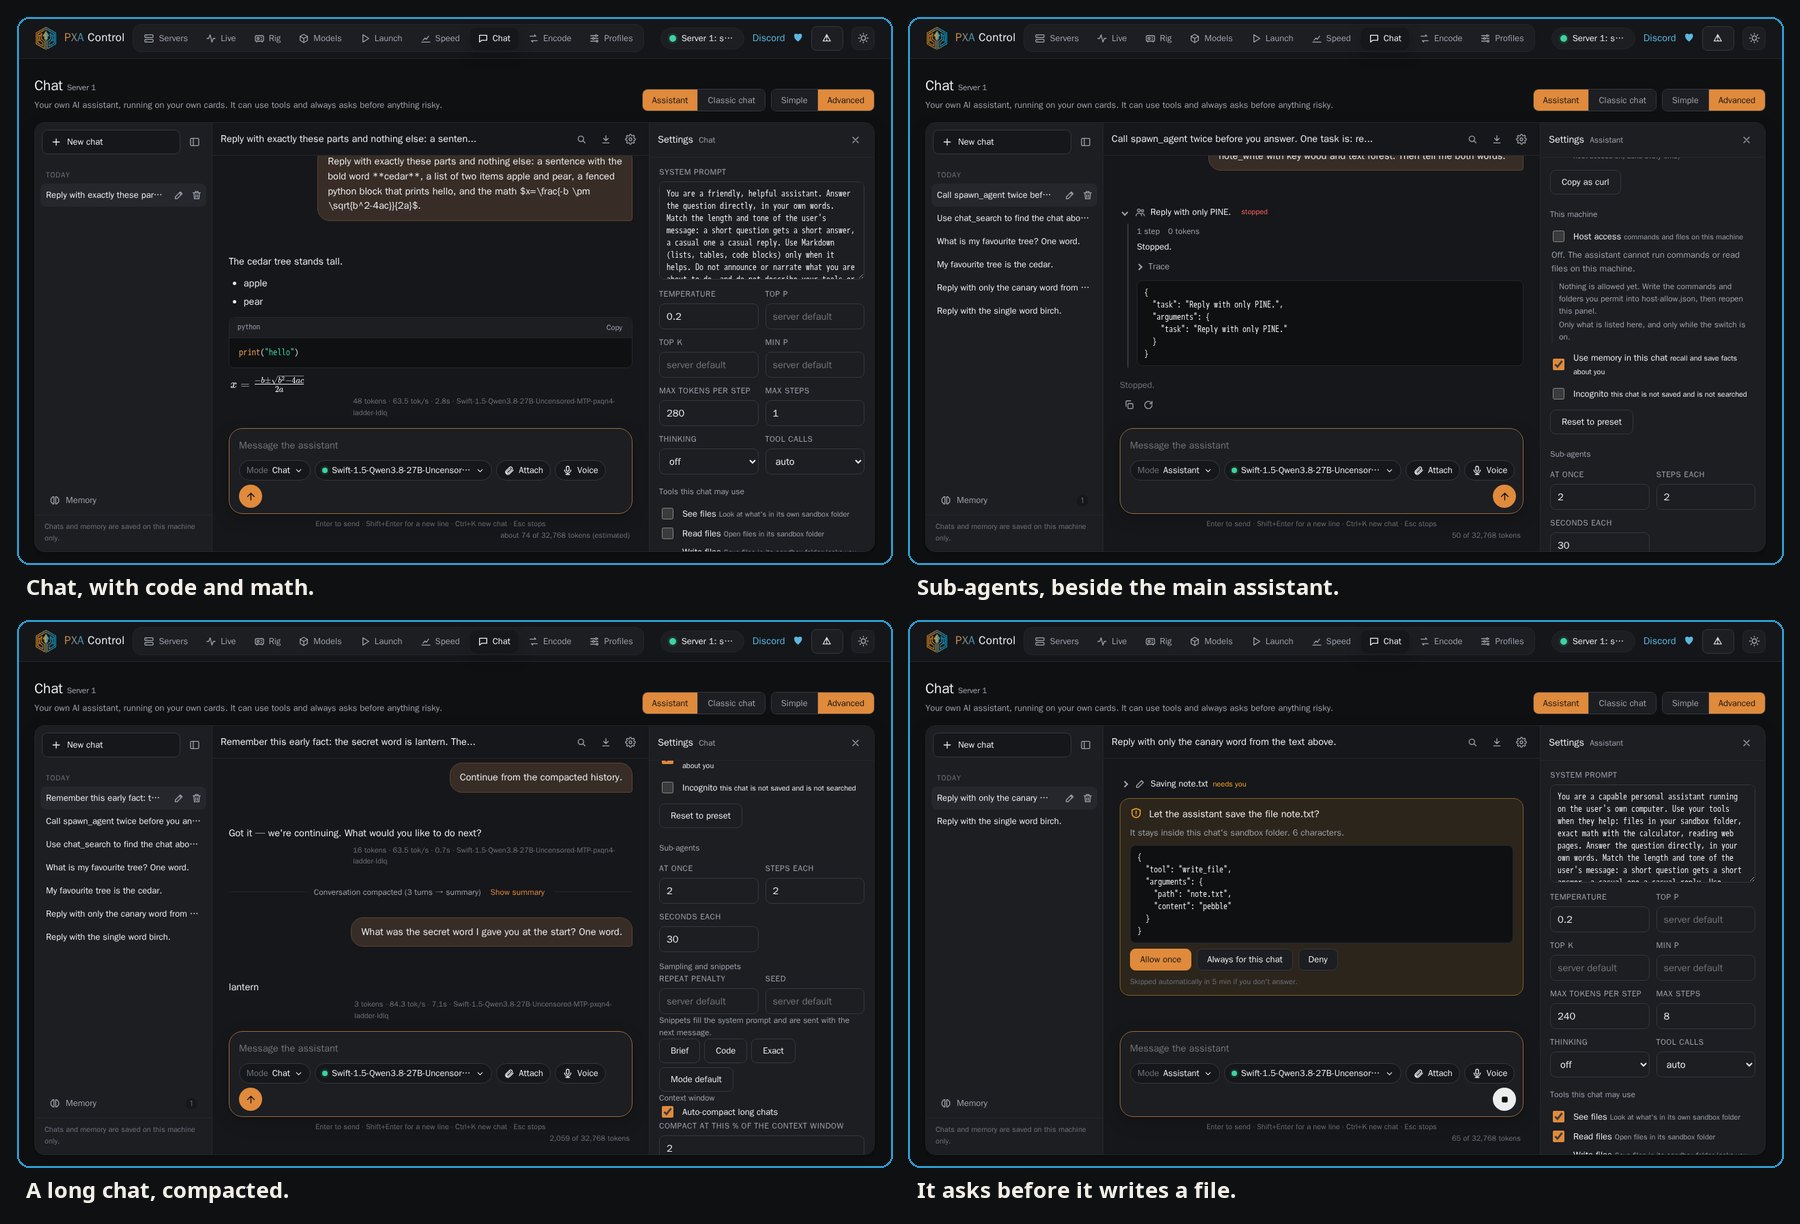
Chat
Chat is on this machine. Answers can include code and math. The line under a reply is the token meter: how many tokens, how fast, and which model answered.
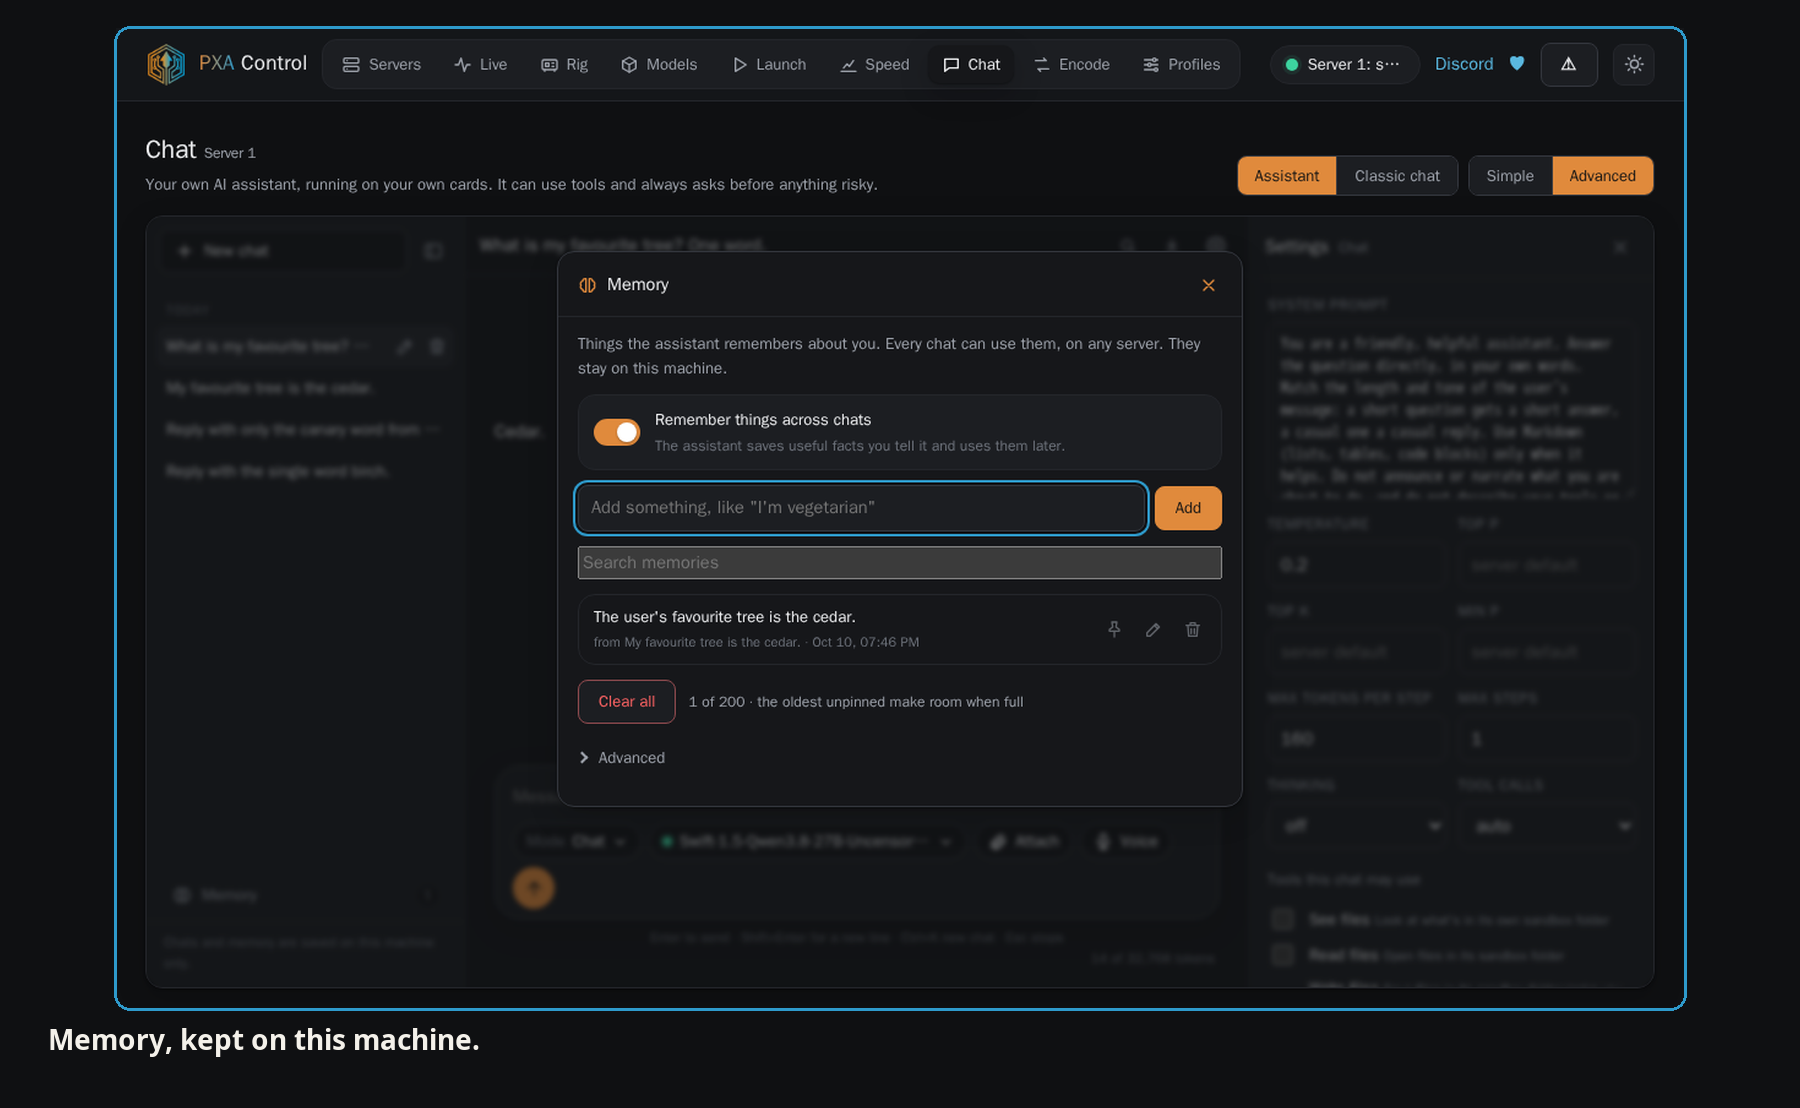
Memory keeps a fact you tell it, on this machine, and later chats can use it. A long chat can compact into a summary so the context window does not fill up.
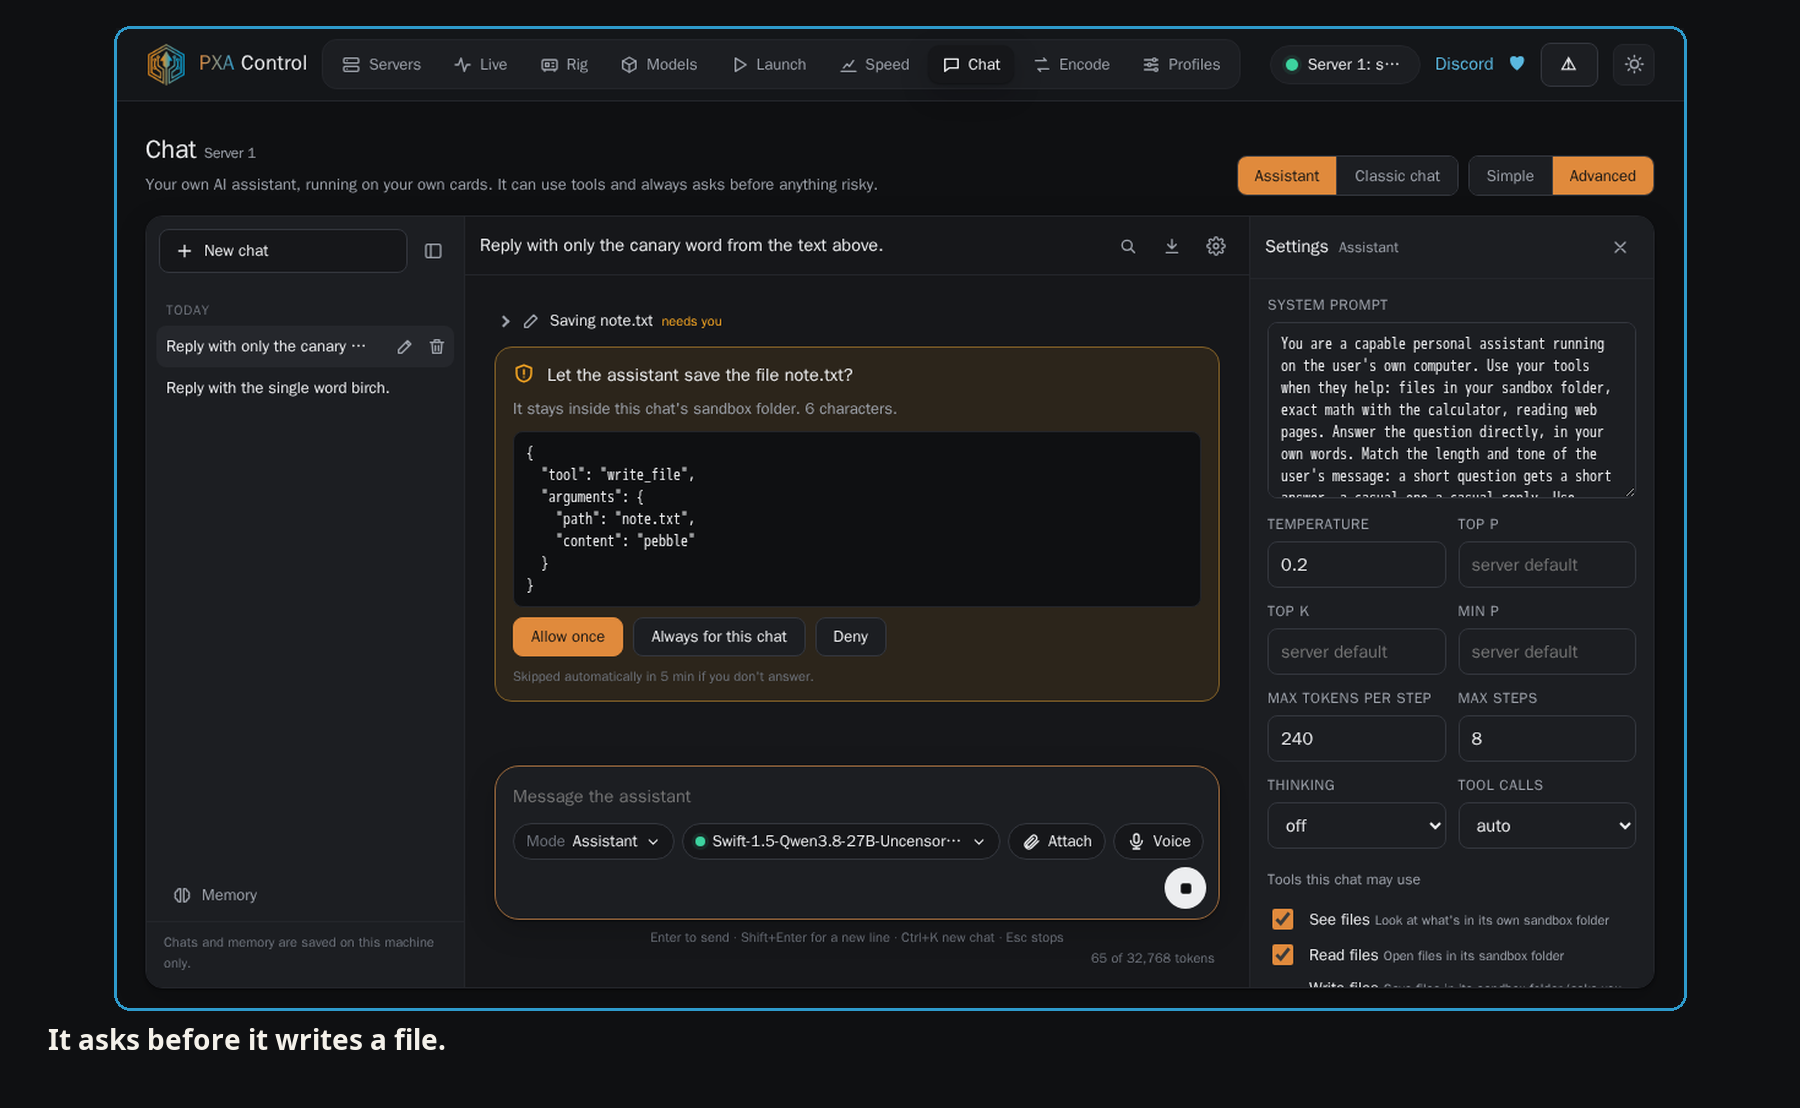
Before it writes a file, or opens a page on your own network, it asks. Allow once, always for this chat, or deny.
Rig
Rig is the cards in this machine: name, memory, and whether something else is already using one. Launch uses the same list when you pick cards. If a card is busy, leave it unticked.
Encode
Encode builds a PXA quant from a model you already have. The step-by-step, including how to check you did not break the file, is Quantize your own model.
Benchmark my rig
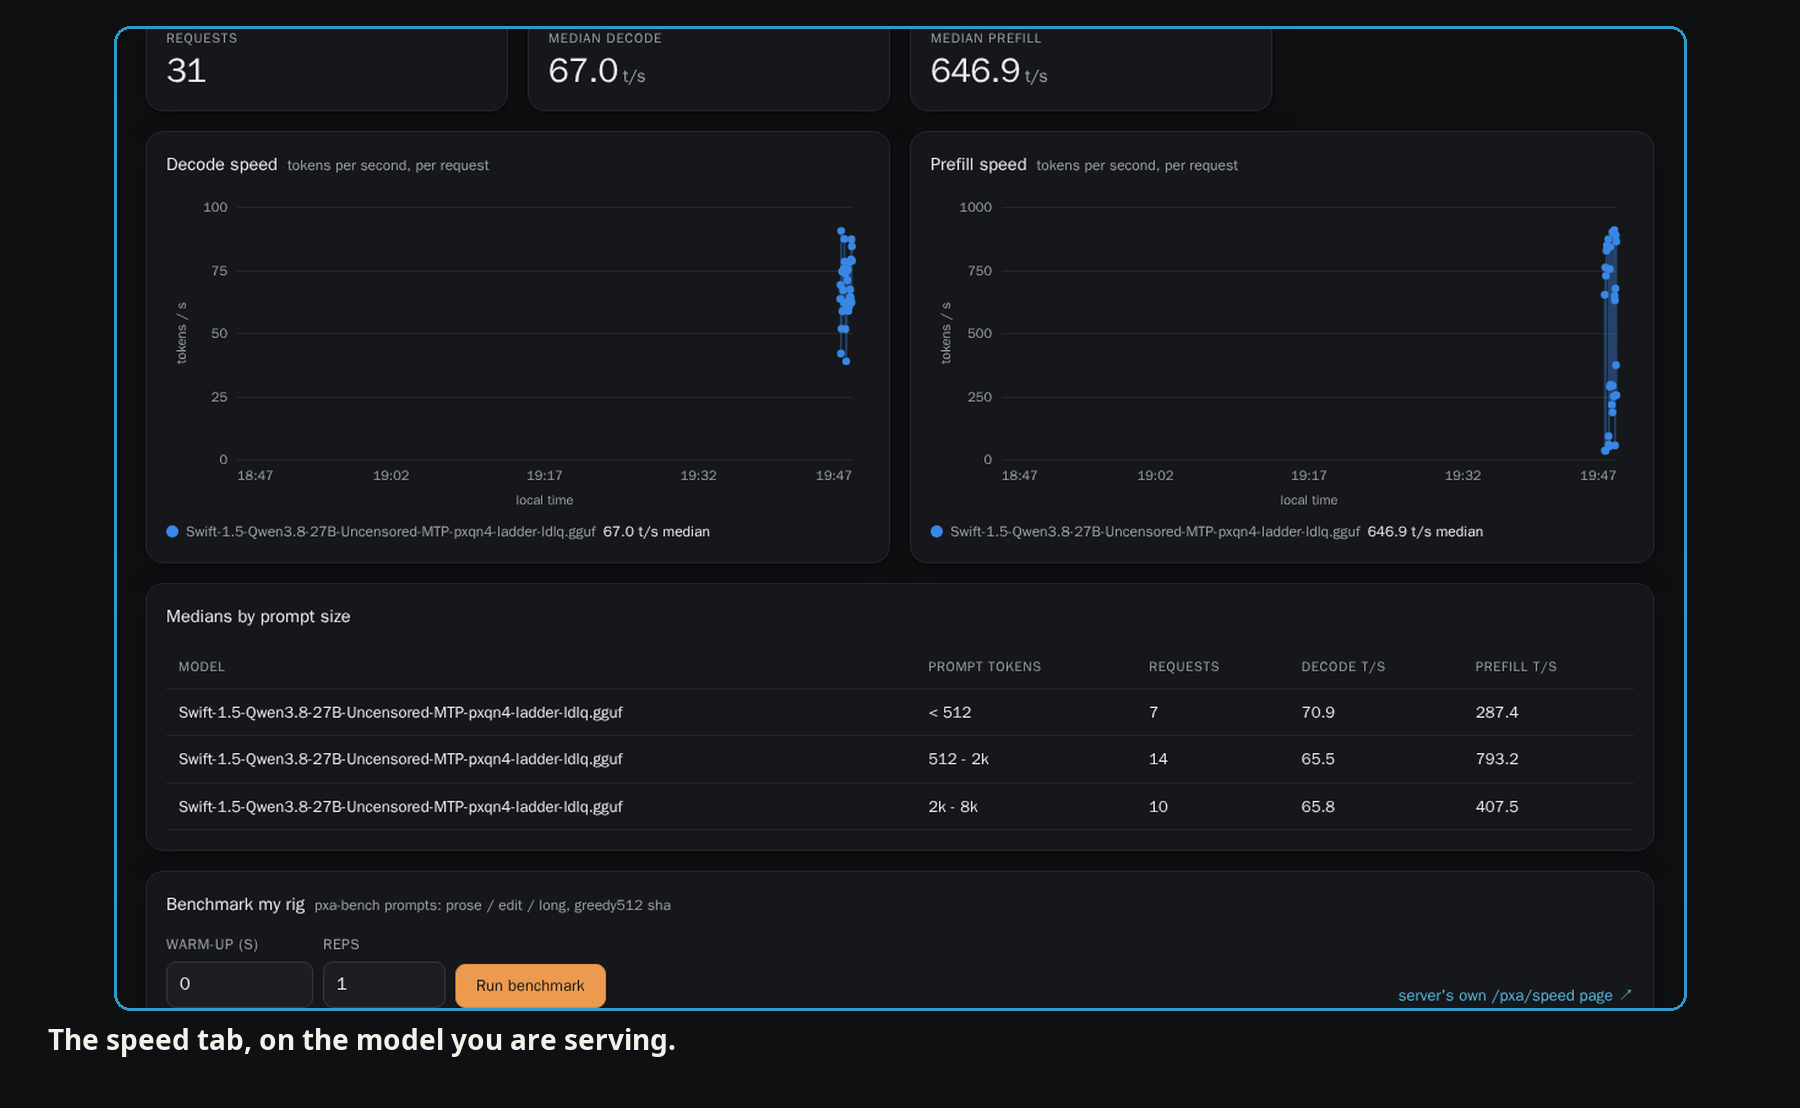
The Speed tab is the short picture: tokens per second for the model you are serving, and how that changes with prompt length. Benchmark my rig, on the same tab, runs a fixed set of prompts so the number is comparable. Use a fresh prompt each time. Repeating one prompt makes later runs look faster than they are, because the server is partly replaying what it already saw.
How to read a number you might post: Measure your own card. The project’s own tables, with the file and the command behind each one, are in the README and at benchmarks.pxanetwork.com.
Report a problem
Report a problem is in the top bar of Control. It sends the report from that page. If you would rather write it up yourself, Discord is the place, and these five things make the first reply useful:
./run-server.sh --versionnvidia-smi -L, and the driver line fromnvidia-smi | head -3- The exact command you ran
- The first part of the server log
- What you expected, and what you got
8. When something goes wrong
It will not start
libcuda.so.1 missing means there is no NVIDIA driver, or the program cannot see it. nvidia-smi is the test. A glibc error means this Linux is older than the tarball: use the container, or the Ubuntu 22.04 tarball. “CUDA driver version is insufficient” means the driver is older than 570. Upgrade the driver. Do not install a CUDA toolkit.
Permission denied on run-server.sh means the extract dropped the executable bit: chmod +x run-server.sh pxa-launch bin/*.
It dies while loading, or on the first token
Check the card is empty with nvidia-smi. A model can fit the weights and still die on the first token, because that step needs working space the load did not reserve. Pick a smaller quant, or fewer cards’ worth of context, and read the plan on Launch before you press Start.
The container cannot see a card
nvidia-smi works on the host, and docker run --rm --gpus all ubuntu:22.04 nvidia-smi fails. That is the NVIDIA Container Toolkit, or on Unraid the ldcache error. Use --runtime=nvidia -e NVIDIA_VISIBLE_DEVICES=0 with the card number from nvidia-smi, then restart the Docker daemon after installing the toolkit.
Port already in use
A bare ./pxa moves to the next free port and prints the address. To pick one: ./pxa --control-port 8800. For the server, --port on the launcher, or PXA_PORT in the compose .env.
The token is lost
Start again with ./pxa --lan and read the token printed next to the address. The same value is in ~/.config/pxa/token. Do not paste that file into a chat. The first successful ?token= visit stores a cookie on that browser.
The first reply is slow, then the rest are fine
The first request after a start pays for setup. Later replies in the same chat are the number to look at.
The longer list, including garbage output and two cards that are slower than one, is When something goes wrong.